It was the big heads that got me I think. There’s something that is simultaneously non-threatening and adorable about giant mobile suits being rendered into tiny, chibi versions of themselves. Unlike their larger, occasionally terrifying Master and Perfect Grade versions, the small Super Deformed Gundam models just seem to call out, “You can put me together! I don’t take up much space! Look at how happy I am!” So it’s really no wonder that as a small child, an increasingly long time ago, I gravitated towards the friendly looking little robots with the great big heads over their large, militant brethren. What continues to amaze me, is how the hobby of putting the little brutes together has evolved for me as I’ve gotten older, and if anything, is stronger now than when I was a kid. All this month we’re featuring things that we love, and we’d love to share with you and that means we’re going to put one of these tiny, adorable little guys together; and along the way share some of the history behind this hobby.

Select / Start
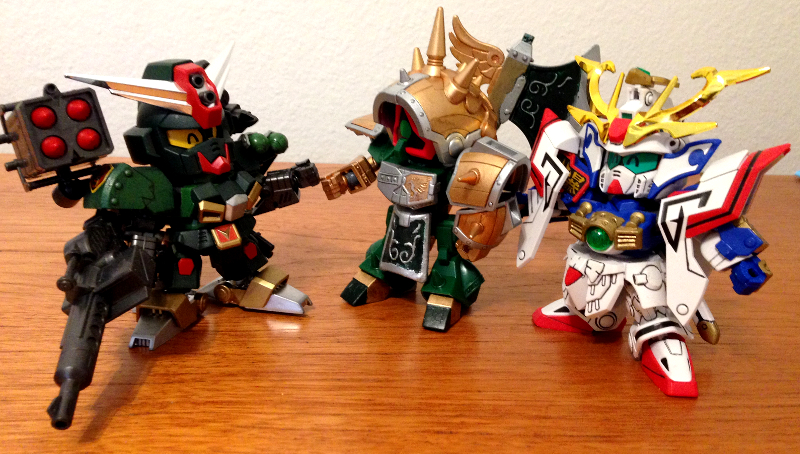
So let’s get started. The first thing to do is find a model that you like. When it comes to SD (that’s still stands for Super Deformed) the models are all based on characters from a Japanese television show. I’m sure if people watch the show, they get really into selecting the model of their favorite characters. I’ve never even seen the show so I have no idea who any of my models are. Instead I tend to select robots based on how interesting they look. This usually leads me to the Knight, Musha and Three Kingdoms lines, since they are basically little robots dressed up in armor and robes. The effect is, as expected – adorbs.
With that in mind, I felt like doing something just a little different, and wound up going with a robot named Ten-i Asshimar. Since I didn’t know anything about the little guy, I looked it up for you, Here’s his bio from the official wiki:
Ten-i Asshimar (典韋アッシマー)
-
- Character Basis: Dian Wei
- Actor: Asshimar
- The unmoveable power. A member of the Enshuu Troops in the Korou Fortress battle.
I have literally no idea what any of that means. I selected him mostly due to the cool looking lion themed armor and his giant ax which has the ability to transform into a different giant (relatively speaking) ax. Not everything needs to have a reason other than, “Because I think it’s cool.” With that I spread all the pieces out to see what I had to work with. All Gundam models start off looking like this:
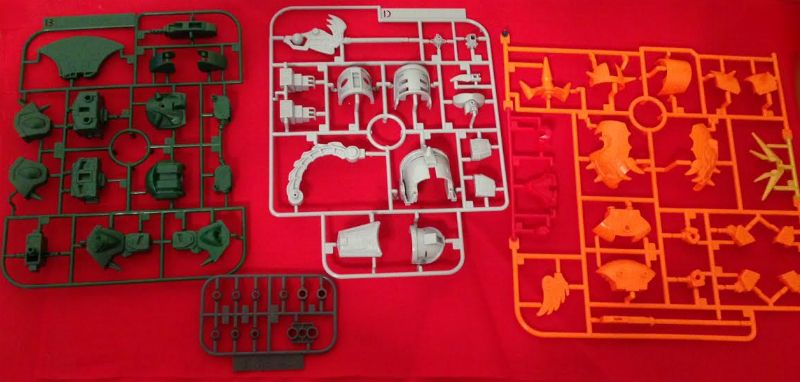
- These are called “sprues.” Every single piece you need is conveniently numbered, and all of the individual sprues have their very own letter. This is important because the instructions look like this:
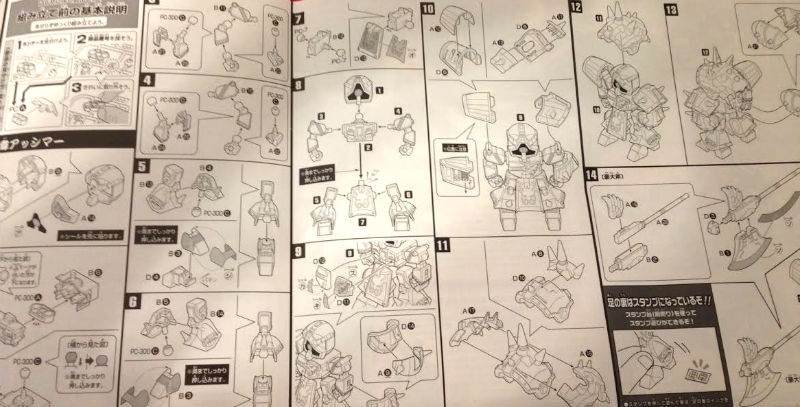
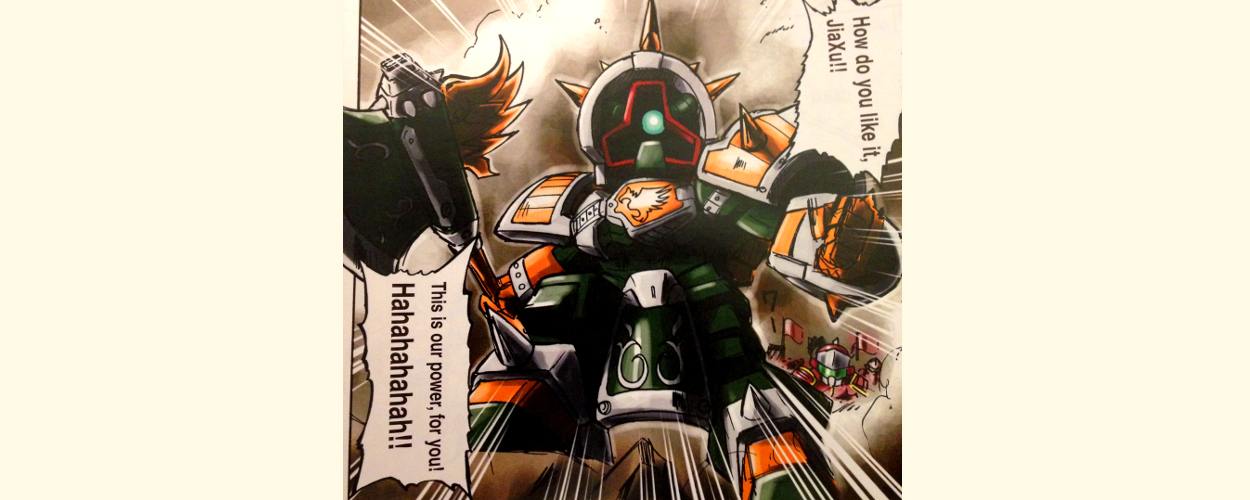
Notice that the instructions are all in Japanese. This is always the case. Inside the box are the instructions, and on the back is a comic featuring the character you have. Up until recently, that comic was also in Japanese. The only things on the instructions not in Japanese are the letters and the numbers. I seem to remember that once upon a time, these were in Japanese too, and eventually you had to get pretty good at reading Japanese numbers to figure it out.
Sand(ing) Bar
For the next step we are going to punch out the pieces and start fitting them together. At this point I follow the instructions, but keep a nail file handy. You see the sprues don’t always break cleanly, and I found that unless I want weird plastic nubs sticking awkwardly off of my robots, I should sand those off. Those nubs also look awful if I paint over them. For many people, this would be the end of the endeavor, full stop. For me, this is one of the many exceptionally relaxing aspects of building a big headed robot. I pluck out the plastic piece, and gently sand the rough spots until they are nice and smooth. Then I repeat the process again with another piece and again after that, until I have constructed an arm. Then, a few more pieces, and a few more minutes of sanding, and, wouldn’t you know it? I have legs, and a torso. Before long, I have more pieces too, and would you look at that?
-
I know, he doesn’t look like the box yet. For one thing, there’s no stickers on it, but I think Ten-i here is cutting quite the handsome (if diminutive) figure anyway.
All of that slow sanding and building is something that I find deeply satisfying. I think it’s because, generally speaking, I have a very noisy brain. I’ve been told before that I’m always on, and I certainly feel that way. My mind is often a chaotic place, with ideas and half formed notions and intuitions just sort of buzzing around like a wasp’s nest on a Hunter Thompson-esque bender. That’s not to say that it’s the worst thing ever, and if anything having a constant stream of ideas and arguments is really helpful sometimes. It can be exhausting however. Sometimes, if only for a few hours, I just want the volume turned down just a little bit. Things that let me have that (like Ten-i here) are treasured. Just a little sanding on a quiet afternoon and soon a little dude is looking up at you. It’s a good thing.
Paint It Black (or Red, or Blue or whatever)
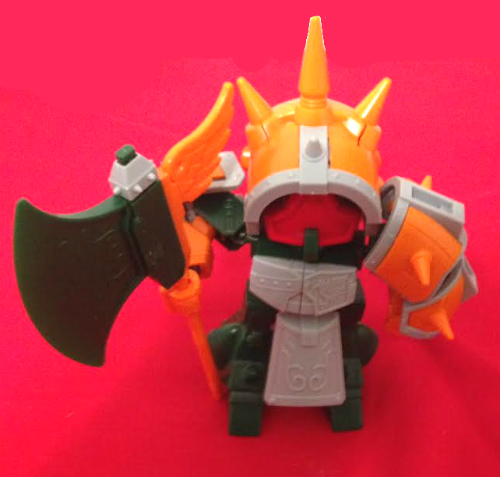
This is the part where we paint. This is not a step you need to do if you don’t want to. Maybe you are happy with the colors as they are, and that’s okay. It’s your little robot, so feel free to do what makes you happy. I like to paint mine. For Ten-i, I’ve decided that the gray looks bad, and the orange is not much better; so I’ve chosen instead to go with metalic gray and gold. I think the green looks nice though so I’m keeping it.
There are a couple of different methods for painting a Gundam. The most basic uses brushes, pots of paint, and the patience of a saint. I’ve seen some great examples of hand painted Gundam, but that’s a whole different level. The most extensive involves an airbrush, and there are some really great results you can get out of using one. Personally, I don’t do enough painting to justify the costs. Instead I go with model spray paints. You can get them in a variety of stores, and they tend to apply cleanly to plastic.

For me, painting is the part I have the least control of, which is why I don’t paint things if I can avoid it (like all of Ten-i’s green parts). So after taking all the parts out back, putting them inside my contained cardboard painting box and giving them a good spray some things became apparent. First of all, my silver chrome looks amaze-balls. It’s so shiny and glossy. Second, the gold didn’t go onto the orange as well as I would have liked, and most of the orange shade is still peeking through. At this point I could go back and add a whole second coat, but the more coats you add the more likely the detail starts getting lost, so that’s not going to work. But as it is the gold colors are splotchy in places, almost like Ten-i was in a fight.
It didn’t come out just right, which bothered me and I considered putting the little brute back in the box. Instead I had a creative epiphany – Battle Damaged Ten-i Asshimar! I took my trusty nail file and applied scuffing to the bolts and other leading edges. Especially to the gold parts. Before you ask, no – my Gundam models are not all “Battle Damaged.” I find that when it comes to painting, sometimes the strange quirks of the paint or the model present themselves in odd ways. For example, I built a Command Gundam with a dark green armor. The paint though, didn’t spray evenly but gave the little guy the effect of camouflage armor that I ended up very happy with. I guess what I’m saying is that just because something doesn’t go perfectly, it can still turn out pretty good. After all, these are hand built little objects,and it’s the minor imperfections that really give them character. It also means that the robots that I built are uniquely mine. There may be hundreds of Ten-is out in the world, but this one belongs to me.
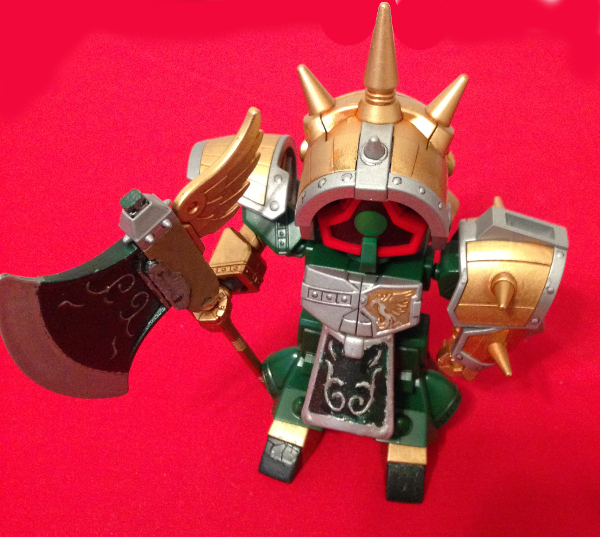
A Thin Black Line
But we’re not done yet, oh no. If you take a gander back up at Godmaru at the top of the article, you’ll notice something very strange. He’s covered in little black lines. Those are technically called “panel lines.” They’re on his wee face and armor and almost everything else. The reason for that is twofold. First, the SD Gundam models don’t really have a lot of pieces. The larger models may have pieces for each digit of the fingers, but Ten-i simply has cute little fists. With the larger models lots of detail is available simply because of the number of pieces. With the SD versions, we get to be more creative. Second, and this is a personal preference of mine, I like the small robots to look more cartoon like, and inked outlines really helps that.
As another relaxing exercise, the next step is to go piece by piece and add panel lining to everything. This takes a while. The weapon of choice for this step is a Copic Multiliner at 0.03mm or 0.005mm thickness. The thin one is great for light colors (like Godmaru up there) and the 0.03mm is really good for darker colors, since the lines are bolder. For most things, I prefer black since it’s the most cartoon like. However, for some colors (like the gold) black is way too harsh, and instead I have a 0.03mm brown. It’s at this point I turn on some music, steady my hands and get to work. Ideally, a lot of light is preferable so you can see what you’re working on. I also like to have a plastic eraser on hand since it allows me to fix mistakes. I highly recommend having one too, since it prevents you from stressing out about making it perfect, and to me not stressing out is one of the best features of this hobby.
My rule of thumb is to line only the creases that have convex edges. In other words, if it’s protruding out it doesn’t need a line. Natural light will catch those edges and show them off anyway. If it’s protruding inwards it lives in shadow and could probably use the help. So take your pen and apply it slowly, but be steady. The convex edges will guide you, so just drag the pen along their natural grooves and try to get a clean line. If you mess up, no problem, you have an eraser.
I find this step to be the part where I really get to focus on the small details of the already small robot. Like, it turns out Ten-i has almost invisible bolts all over his armor. I know this because I outlined them all. For this part, it’s a lot easier to work piece by piece. Just grab each individual piece and work your way around it. The lines will occasionally wrap around, and that’s okay. Just take your time, breathe, and find enjoyment in making a piece really come to life.
Once again, this is one of those small tasks that I find deeply meditative. Even more than the sanding, in this case I’m focusing deeply on a single task with a single thing to do. All I have to do is find where the line goes and ink it. It’s like working on a comic book (something else I can ink and feel deeply satisfied with), just keep on adding the inks until a leg is done, and the pipes on the tiny head are all done and the fingers are inked and all full of minuscule determination. Setting them aside and watching them collect in the “done” pile is one of the many small joys of this hobby. I love how I feel so at ease while simultaneously getting something accomplished.
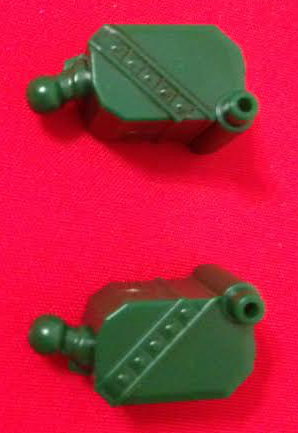
I know, I know. Ten-i is mostly orange and green, so how do outlines help? Well, thanks for asking that rhetorical question. The answer is because it makes the details pop. If you look over at the right, I have examples. See how the one on the bottom is sort of flat looking? Some detail is there, but only if you’re looking for it. Even though it is subtle, the example on the top has panel lining. You’re able to see the small bolts and square pattern a lot better.
After that long and soothing process we’re almost done. Now if there are any stickers that we want to use it’s the time to apply them. Ten-i is getting his little face/eye sticker because there’s no way I could paint it and make it look nearly that good. With that out of the way I like to apply a clear coat on the pieces. I use a flat clear coat since I like the little SD Robots to look like cartoons, and cartoons aren’t shiny. This step makes the plastic look less, well, “plasticky.” Also, the clear coat will seal in the details from the inking and bond the sticker decals so they last forever, which is basically what we want.
Once it dries, follow the instructions and put your new little robot together, and bring them to life. After all of that, here’s the finished Ten-I Asshimar:
For me, building Gundam models has always been a part of my life. I spent the early years of my childhood living in Japan, which has given me a lifelong adoration of rice dishes and SD Gundam models. Of course, when I was a kid I didn’t paint them, but it’s a hobby that has grown with me. Besides, how many things do people love as adults that their 6 year old incarnation loved just as much? These little brutes bind me to my past, while they give me solace in my present. So it brings me great pleasure to share with you all this wonderful thing, and hopefully get you interested in spending some time with a big headed robot.